"...looking at the work done and the work still to do, most people would have written the whole thing off as too much sweat for too little gain. But I didn't want an easy life. I wanted a beautiful one." ~Ben Short~ Photo by Patrick Lane

Wednesday, December 11, 2024

On Lightness and Harmony

If the rider's aids are precise and well-timed(QUICK), there is no need for strength. That is the lightness we're seeking: a precise system of communication that develops a clear understanding. Lightness and harmony depend on precision and timing.

This is, of course, the ideal. As was pointed out to me by my coach, Rachel Saavedra, recently, Dressage is a sport of "ideal". When you read the books, watch the video tutorials, and hear the interviews of the top riders, you are usually only hearing about the brilliant moments...the highlight reels. It's the tip of the ice berg. As David Wightman once told me, there's a whole lot of ugly before it gets pretty.

If you were taking gymnastics, or dance, for example, instead of a riding lesson, and your coach was teaching you a new movement, your coach would first break the entire sequence down into the smallest sized pieces, and then further simplify by SLOWING it all down. Once you learn each piece of the movement correctly, with good biomechanics and a clear understanding of the desired outcome, only then would your coach have you speed up the sequences and meld them together to form an entire movement. This would happen for every part of every dance or gymnastics routine. Same for martial arts and other endeavors that involve movement.

It is much more difficult to do this when a 1200 lb animal is involved in the educational process. The horse doesn't speak your language; he is extremely sensitive; and the vast majority of riding coaches have only been taught to ride, and not necessarily taught to TEACH.

I'll give you two exercises to help you improve your timing and precision. These can be done in the walk.

1. Post to the walk. Go large around the whole arena. Let the horse have an active, ground covering walk, and do not spend much time futzing with the reins. Let him have room to move out. If you have an enclosed arena, go on the rail and eliminate as much steering noise from the conversation as possible.

This is MUCH more difficult that posting in the trot for a couple of reasons. First, when you post in the trot, you have the benefit of the thrust from the horse's hind leg which will literally push you out of the saddle. Most people learn to post the trot by letting this happen, and seldom go beyond this phase to learn how to dictate how the horse uses his hind legs and back with their own posting mechanics. Secondly, it's more difficult to post to the walk precisely because it is slower, so, you have to have sufficient tone to hold yourself up long enough to stay on the correct diagonal and in the correct timing, vs. in the trot where you can just push off your stirrups.

In order for this exercise to be effective, you must PICK the diagonal you are rising to(and be sure to CHANGE the diagonal frequently), and you must STAY on that diagonal until you decide to change to the other diagonal. One of the keys to being precise in the application of your aids is rider tone, strength, and symmetry. We all know we want it from our horses, but how many riders spend at least as much time each day demanding it of ourselves as we do demanding it of our horses? Posting the walk will strengthen the muscles of your lower back, abdominal muscles, and upper legs. It will improve your balance as well. And by staying on the diagonal you've chosen, it will improve your eye as well as your feel over time.

2. Cue the horse's hind leg just as it is starting to leave its stance phase and transition to the swing phase. Again in the walk, going large, with the same directives as above, learn to feel when the horse's inside hind leg is beginning to swing. Be sure to change the rein frequently so that you can work equally on learning the timing for both hind legs. It will either BE different, or, FEEL different, due to horse and rider asymmetries, strengths, and weaknesses.

Every leg, in every gait, has a stance moment, and a swing moment. If you have a ground person, they can help you by calling out "now" every time this happens with the inside hind leg, so you can listen to the timing as you ride. If you have a mirror, you can watch in the mirror. If you have neither, you can literally look down to the inside hind leg for a few repetitions, until you can relate what you are seeing to what you are feeling.

Once you have the timing down in your mind, pulse or tighten your own inside leg at the same time. It can be a little bump from the entire calf to heel; it can be just the outer hip muscles; or it can be the whole leg, hip to heel. Try them all. See what works. Make the engagement of your muscles be in the same tempo. In other words, do not just keep the muscles engaged. This is extremely important. The horse learns from the release.

Remember I said above that horses are extremely sensitive? How many readers immediately thought to themselves..."My horse isn't sensitive; in fact, he's the laziest horse on the planet!" I assure you, it is the dull/lazy horses that usually are the MOST sensitive, and frequently also the smartest. Becoming dull and/or lazy is a coping mechanism they've employed to drown out all the conflicting messages they are getting from their riders. Here's your moment to look in the mirror and realize you've contributed to this. Now, get over it, move on and commit to learning to be more precise. It won't be easy, It'll take time, effort and focus. But, if you stay the course, eventually even the dullest horse will become re-sensitized. I promise.

As you get better at your timing, try to notice what part of the aid your horse is responding best to. You will likely find that as you get more and more precise, you can use less and less aid to get the same amount of response. I find that the horses who are most resistant to the leg are usually the most sensitive, and would probably respond best to just your hip. You may have to explain yourself with a very precise touch(and I DO MEAN TOUCH, not strike) of your whip at the same time as you engage your leg. Make the touch of the whip as light as a fly landing on their side. The good news is that in the walk, there is no impulsion to jostle you, so, you can take your time to learn to be very precise.

Of course, eventually you'll want to trot and canter, because the horse needs to. But, spend five or ten minutes of each warm up and cool down phase playing with these two exercises, each day. And of course, there are always caveats to every exercise. As Janet Foy says, everything we teach our horses will be used against us later! For example, at some point, you'll need to learn to time your aids to emphasize the stance phase of the hind leg or your horse will never learn to keep his motor running when you try to initiate a downward transition. A topic for another day!

Namaste.


Wednesday, August 9, 2023

Making the Most of Your Training Dollar

 Let's face it, owning horses is not an inexpensive proposition. Buying the horse is the least expensive thing you'll do as a horse owner. And once you have that dream horse, then what? Horses don't come with owner's manuals, but they DO come with a mind of their own. Can you think of any other Olympic sport that requires coordinating the minds and bodies of a human with a creature who speaks a totally different language and outweighs that human at least ten to one? The Olympians rarely ride without at least a set of eyes on the ground. The team has their own dedicated team coach, in addition to each rider's private coach, with whom they train weekly, if not daily. Which brings me to the elephant in the room...training for the every day, average Dressage rider. 

I know, I know...it's expensive. You just wrote a check to the farrier, the vet, the boarding facility, the feed store, the hay supplier, your truck and trailer insurance provider...maybe you even just paid your entry fees for the upcoming show you've had your eye on. Don't even get me started about membership fees and tack. And if you're like most average Dressage riders, you're probably also paying a mortgage, a grocery bill for a family of four, and all the other household expenses that go along with raising a family. Who knows, maybe you're even paying for college tuition or the elder care of a family member, or both. Or the co-pay on a recent knee surgery. Life is expensive. Riding your horse is supposed to be an OUTLET, not a source of stress, right?! And now some trainer wants to get paid for barking orders at you?!

It's called The Sport of Kings for a reason. Only in the last century or so has horse ownership become more of a middle class endeavor.  But the goose is cooked: you own the horse and have the show entries paid. What now? Get some lessons! Better yet, pay a trainer to keep your horse in regular work when things get tight meeting all your obligations and you just can't get to the barn. It really is money well spent to invest in your and your horse's education. I speak as both a trainer who provides this peace of mind on a daily basis to a full book of clients, as well as a horse owner who strives to bring my own horses up the levels to best of our abilities as a team. I've lived in a place where access to training was nonexistent without extensive travel. Heck I've lived in places where it took me an hour just to even get to the barn to ride my horse, and that's if the mountain pass wasn't closed due to whiteout conditions in winter. I'd be a lot farther along in my own riding if I'd been willing to invest in paying a trainer to ride my horse when I couldn't get there, or if I'd always lived in places where there was on site access to good training. But, we don't know what we don't know, and, when we do know better, it's important to do better. As soon as it became clear to me that if I wanted to improve myself and my horse, I needed to avail myself of training, I figured out a way to make it happen. I couldn't afford to pay for full training, but, I did have time to give, so, I became a working student. Then, once I became a full time trainer myself, I made a point of travelling to clinics and shows to further my education. I signed up as a participant for the  USDF "L" program the very second I was eligible. Ditto the USDF Instructor Certification Program. Travel costs for both programs were extensive. I didn't necessarily recoup those costs in terms of immediate pay increase, but, the skill sets I gained as a result made me a better rider and trainer, and put me in a better position to make the most of future opportunities which have far outweighed the financial and time sacrifices I made then.

Enough about me, what about you? You have no desire to become a trainer. You have a horse, and you want to improve, maybe even show. You have to make every training dollar count. What follows are my tips for maximizing your training dollar, my hard won lessons from both sides of the transaction. 

1. Be on time.

Better yet, be early. It seems to go without saying, right? You've signed up and paid in advance for the very expensive clinician touted as having the magic touch. Of course you're not going to be late to your $250 lesson, right?! Well, you'd be surprised how often I see it...people getting distracted by things that don't matter. I can groom and tack up my horse in 20 minutes flat and that includes a curry, polo wraps, hoof polish and fully brushed out tail. If I am running late, I always keep clean boots in my tack room, and my horse doesn't need to pass a white glove test. My lesson time is far more important, and it's even more important that my horse have ample time to walk and loosen up before being asked to work hard for me. His hooves don't need to be shiny if time is short.  

If you are fortunate enough to have weekly(or even DAILY) access to lessons, that is all the more reason to be on your horse-who is working in a familiar environment-ten minutes early, walking him out to loosen him so that you can go right to work when your coach is ready for you. Think about what that lesson costs you per minute. A $90 lesson is $2/minute. Unless the trainer specifically says "I want to work on your warm up routine", you and your horse should be ready to work when your coach turns on the headset. If you take weekly 45 minute lessons, and you're 10-15 minutes late to each lesson, you've basically paid for an entire lesson with wasted time by the end of each month. Your regular trainer is invested in you. Show off your horsemanship skills by having your horse already loosened up when your lesson time starts. That will make your coach far happier than a spotlessly clean horse arriving 15 minutes late.

2. Watch Other Lessons

Watch other lessons your regular coach gives. Watch other lessons the famous clinician gives. Of course, be courteous of others' paid ride time: ask permission/pay the audit fee, take notes, write down questions to ask during a break, and DO NOT TALK. Don't talk to the coach, don't talk to other riders while sitting next to the coach, just...don't talk. It's rude and distracting, and interferes with the paying client's lesson.

If you're the first rider up with a famous clinician, search out publicly posted videos or written clinic reports of that clinician teaching other riders so you go into it with some idea of what to expect. You'd be surprised at how much is available for free with a basic internet search, especially if it's a popular clinician. Better yet, pay to audit the first time he/she comes and get your name on the wait list for future visits, if it's a regular clinician. 

3. Take Virtual Lessons

This is something that was not so easily available when I was living in a place that required I travel for training. But the cost and quality of equipment has improved dramatically in recent years. I personally prefer to work with the PIVO platform. It has its shortcomings because it follows the motion and not a tracking device, but if you have the arena to yourself for 45 minutes, it's a nifty tool.  SoloShot has a GPS tracker, so, you need to be outside, weather permitting. And, it doesn't necessarily have a real time platform so lessons will not be real time. It's a better option for for recording yourself at shows or clinics. Pixio uses preset triangulating lasers, so this can be used indoors. They all are glitchy at times, but, they do work. You can even do a FaceTime lesson, if you have someone to hold the tablet for you, and unlimited data with good connectivity, or an indoor with Wi-Fi. Nothing beats in person lessons, especially if you have a young horse or are having trouble understanding a concept. The coach can't just jump on for you. But, it beats riding alone every single day with no eyes on the ground.

4. Watch Videos of Other Riders

Whether it's your favorite rider, or, someone else just like you posting some show or lesson video, watching videos of others riding can be very helpful. The caveat is of course how well-developed your eye is. I can honestly say that I get far more out of watching others ride now than I did fifteen or twenty years ago, because my eye has been developed. But, if it's a top rider who is consistently getting good scores, or, the average rider who generously shares what their score was, just watch and absorb as much as you can. Humans are not unique in the animal world in terms of learning by observation, but, humans do have the capacity to develop the skill to a very high degree. Spend some time developing your eye.

5. SCRIBE AT SHOWS!!!!

If your horse came up lame, or, your budget did, offer to scribe at the next show. You usually get a free meal out of the deal, and sometimes even a hotel room paid for. Shows always need volunteers. Scribing is hands down the very best way to learn what the judges are looking for. It is not easy to actually see what is going on, because your job is to record the scores and the comments, but judges are always very generous with their knowledge. There are often breaks in the action, and the warm up ring is usually visible, so, ask the judge some questions about what you are seeing. And as your skill as a scribe progresses, you will find that you can look up from time to time.

6. Groom For Your Friends at Shows

If your friend is going to a show and will be receiving coaching, GO HELP HER. Listen, watch, ask questions, help the coach, help your friend...everybody wins.

7. Join a Virtual Training Program

There are some really great training subscriptions available these days. They require subscriptions to get full access, of course, but it's a great way to gain access to good information. Some of my favorites: Thomas Ritter; Amelia Newcomb; Begijnhoeve; DressageTrainingOnline(this one is unique because they feature NUMEROUS trainers, riding and teaching); and YourRidingSuccess.

8. Read Books

Not everyone learns well this way, but if you do, there are so many great tomes out there to help you. My favorites are Dressage for the 21st Century by Paul Belasik(this is my GO TO BOOK) and Dressage in Harmony by Walter Zettl. There are so many good, well-written books with great illustrations. You should of course read the USDF Rule Book, the German training manual, and go to USDF's website for their library of educational material. The manuals for Certified Instructor training are extremely helpful. USDF University is a super way to maximize your membership dollar. Take every online course they offer.

9. Keep a Notebook

Jot down lesson highlights, Ah ha moments, anything that helps you remember what did and didn't work. Be sure to thumb through your notebook from time to time. It can remind you of figures or exercises that helped you, or didn't help you. And, it can help you notice patterns, about yourself and about your horse, to enhance future effectiveness.

This is by no means a complete list and I'm certain that as soon as I hit the "Publish" button I'll think of something else. But it's a great head start, and these are all techniques I have personally used to my educational benefit.

Happy Riding!


Monday, July 19, 2021

The Santa Fe Dressage Association Show is in the books!


RENO

That's a wrap! Liz Puerner and I competed all three days at the SFDA show at HIPICO this past weekend. We also competed in the NM-RMDS show in May. Liz has now earned her USDF Bronze medal(in a sudden monsoonal downpour, no less!), and has qualified to compete at Regional Championships at Third Level with her sweet potato, Joyero XXV. JoJo is a 15 year old bay Andalusian. Reno is becoming very steady and consistent in his first show season as a 5 year old, and is qualified at Open Training Level for Regional Championships. Lucky for us, we don't have to go far this year, since Region 5 Championships will be at HIPICO in September! It's a beautiful facility with great footing, good stabling and onsite RV hookups. The setting is spectacular. Frisco has competed in the Intermediare I this year, and we are getting much needed miles in the FEI ring together. He's become reliable, honest and a pleasure to be around. Being a big brother has brought out the best in him. Karen Shaw brought her boy Kilkenny, a Canadian Warmblood, for show schooling, and "Ernie" went around that warmup arena with horses zooming past him at all angles like he'd been doing that all his life-first time away from home under saddle. Ernie will probably trot up centerline for the first time in October. 

Linda Thompson still takes virtual lessons with me since I moved away and left her all alone in the black hole of dressage that is southern Utah. She and Cazador RHR earned a 63% on Fourth level test 2 at the Millbrook Farms Summer Dressage Festival. This is Linda's first score for her Silver medal. She has worked hard for this! I also stay in touch virtually with Ashley Adams, who now has the ride on Diane Johnson's Lusitano, Pi'Tou. Ashley has moved back to St. George and will be riding Pi'Tou until he sells or until Diane returns from her mission.

It isn't ALL about the showing, however. I have been working hard to develop programs for my new clientele here in Santa Fe. Figuring out the best approach with each horse, finding out how to make them happy and comfortable, and keeping my riders safe, is always my priority. Horsemanship comes first. Carol Williams' 16 year old Hanoverian, Cluseau, a GP horse trained by Simone Williams(funny enough, no relation to Carol or to me!) of Ontario, Canada has really blossomed. He and I get along great, and Carol and I have worked hard to rebuild his conditioning and his confidence after a difficult series of setbacks last year. He is back to schooling most of the FEI work and Carol hopes to show him at Third level next year. Liz has two other sweet boys: Xirope, and Contoneo de Ramos. Xirope is an 18 year old black Lusitano who schools all of the Grand Prix. Liz and I are working to build her and his strength and stamina to hopefully enter the ring at I-1  next year. Xirope is a true schoolmaster in every sense of the word. Her new boy, Contoneo de Ramos, is a grey 7 year old PRE, who schools Third level. He's a beauty, and we will probably take him to the October show to school and see the world. He hasn't been shown since he was in the young stallion classes in Spain. Janet Duncan's darling 13 yr old bay Section B Welsh Cob mare "Ginger"(Banquo Lady Valerie) is schooling all of Third level with me, and becoming a good professor horse for Janet. Janet didn't start riding until five or six years ago, when she bought Ginger. But what she lacks in hours in the saddle, she more than makes up for in determination. Ginger is also trail horse extraordinaire, and who doesn't love a dressage horse who can go out for a trail ride?! Janet has an exciting young prospect on the way next week, a 6 year old grey Lusitano named Macarrao. "Noodle" schools Third level. Liz Garfield's sweet 7 year old AQHA gelding Casual Attire "Ty" has found an advocate in her. After facing some training issues, and coming to me for help, we implemented a training program, and worked together to figure out just exactly what was bothering him. Liz and Ty are the trail pros at LCEC, and Liz had hoped to be able to ride him over fences herself at some point. I had been riding him twice weekly, but, progress was inconsistent and he was clearly uncomfortable. With the help of our diligent vet, Mark Medleton, it has come to light that Ty has EPM, and bone spurs in his coffin joints. This is what I mean when I say that there is a lot more to this than showing. Horsemanship, and being an advocate for your horse, are number one. Liz and I communicate regularly to assess Ty's progress during treatment, and it is hoped that he will respond well enough to trot and canter under saddle again. In the meantime, they spend precious time together, with friends out on the trails. We are very lucky here to have onsite access to many miles of well maintained trails, which is great for all of the horses.

My boys are very happy at Las Campanas Equestrian Center. The staff is amazing and the facility is first rate. It has been so easy to become a part of the Santa Fe community, and we have been welcomed with open arms.


Saturday, November 7, 2020

To Every Thing, There Is a Season

 SCWDressage is now DRESSAGE ELEVATED!

I am pleased to announce that effective December 1, 2020, I will be relocating my services to the beautiful Las Campanas Equestrian Club located in Santa Fe, New Mexico. 

I have long dreamed of residing in this historic, artsy, outdoorsy, beautiful city...long dreamed of smelling that distinctive smell of mesquite wood burning in resident fireplaces each and every winter day. Santa Fe is positioned at a crisp 7000' elevation, with the Sangre de Cristo and Jemez Mountains as a backdrop. The city is both the oldest and the highest elevation, state capital city in the United States, and is home of the oldest church in the country. It is the terminus of the Turquoise Trail, and is located at the southern tip of the Rocky Mountains. It is an ancient trade route cross road, dating back centuries.

The stars aligned, and the timing is kismet. 

Utah provided me the opportunity to develop my skill set, along with wonderful mentors and experiences I will cherish. I will miss the red cliffs and blue sky backdrop. I will miss my friends here. I have never lived anywhere longer in my entire life-nearly fourteen years. I decided to rename my program Dressage Elevated as a direct nod to both the Utah logo, Life Elevated, and the high elevation of Santa Fe. 

There is a season for all things, and it is time to strike off on a new adventure, while I still have the nerve!


Wednesday, September 5, 2018

“YOU MUST FEEL EXTENSION IN THE COLLECTION, AND, COLLECTION IN THE EXTENSION”~Robert Dover


This article is the sixth and final article in a series that has served to discuss in depth the various tiers of the USDF Training Pyramid. Every dressage rider should be very familiar with this Pyramid. The tiers are as follows: Rhythm, with Energy and Tempo; Relaxation, with Elasticity and Suppleness; Connection-Acceptance of the Bit through Acceptance of the Aids; Impulsion-Increased Energy and Thrust; Straightness with Improved Alignment and Balance; and Collection-Increased Engagement, Lightness of the Forehand, Self-Carriage. A pamphlet discussing it in depth may be found here: https://www.usdf.org/EduDocs/Training/Pyramid_of_Training.pdf
Since everything we do every day with our horses is interrelated, I will demonstrate with these articles specific connections between the various tiers, and how they can be used to facilitate the training of the horse at every level. The vast majority of riders and horses are at Training Level, but what the reader must understand is that this is the MOST IMPORTANT level, for horse and rider. A good education in the beginning secures the future of every dressage horse and every aspiring dressage rider. ~Stacy C. Williams
The USDF Training Pyramid defines Collection as follows: “COLLECTION (Increased ENGAGEMENT, LIGHTNESS of the Forehand, SELF-CARRIAGE) The horse shows collection when he lowers and engages his hindquarters– shortening and narrowing his base of support, resulting in lightness and mobility of the forehand. Because the center of mass is shifted backward, the forehand is lightened and elevated; the horse feels more ‘uphill’. The horse’s neck is raised and arched and the whole top line is stretched. He shows shorter, but powerful, cadenced, steps and strides. Elevation must be the result of, and relative to, the lowering of the hindquarters. This is called ‘Relative Elevation’. It indicates a training problem if the horse raises his neck without displacement of his center of mass to the rear. This is called ‘Absolute Elevation’ and can, if pervasive, adversely affect the horse’s health and his way of going. Collection with Relative Elevation will enhance the horse’s self-carriage, so that he can be ridden almost entirely off the seat, and the aids of the legs and especially those of the hands can become very light.”
Here we enter into dicey territory. Ask a million riders what collection is, and, you may get a million different answers, particularly if they do not hail from a Classical Dressage background. The USDF definition is clear, however. In order for collection to exist, there must be balance. It must be RELATIVE TO the degree of lowering and engagement of the hindquarters. It is hard to see. Judges and trainers(trainer meaning anyone who sits on the back of a horse and attempts to proceed through the levels-not necessarily a professional) must work very hard to develop their eye. It is hard to develop. It takes longer. It probably means lower scores as it is developing. It is much easier to see elaborate articulation of the joints. It is much easier to see a high poll. It takes time, education, and discipline to discern the difference when a horse instead bears more weight on his hindquarters in the stance phase, narrowing his base of support and shifting his center of gravity more onto the hindlegs. This causes the muscles of the belly area and the thoracic sling to contract, thereby lifting the topline. The poll then becomes the highest point as a matter of training, strength, fitness and ultimately engagement. If this is being done correctly, day in and day out, a horse’s entire musculature will reflect that. He will have rounded, peach-shaped buttocks. The long back muscles, which lie under and behind the saddle, and the trapezius muscles which lie right behind the wither, will grow and create a lifted look to the back. The muscles along the top of the horse’s neck will also grow, vs. the muscles on the underside of the neck. The throatlatch area may even become more defined, and the jugular groove area may become more defined. While a horse’s innate conformation will play a role in how much difference can be made to the musculature, it nevertheless should reflect good training.
If it takes so much longer to develop relative elevation as opposed to absolute elevation, why then is it important that collection be developed in relation to the engagement of the hindquarters? Why take the time? The main reason is to improve the horse’s physical longevity and comfort. I recommend everyone do an internet search of a horse’s spinal processes. If you study the way a horse’s spine works, it serves to illustrate why it is so important that a horse learn to open his topline and REACH for the bit. Teaching a horse to continue to reach for the bit even as he closes his frame takes much longer than simply shortening the reins and driving strongly. When the horse stretches open through his topline, the spinal processes separate, allowing them to work in freedom with far less chance of them rubbing, which would create inflammation and joint damage. It also allows a horse to engage all the lifting muscles in his body, which allows him to use his muscles vs. only the joints, ligaments and tendons in his legs to propel himself over the ground. The whole body works. When the whole body is working in harmony, the horse becomes much easier to influence from very small aids on the part of the rider, emanating primarily from the seat. Because his balance and center of gravity have shifted towards the hindquarters, he becomes more elevated from the shoulder and will feel much taller. Ridden this way consistently, he may actually appear to GROW taller due to the development of the topline muscles as described in the previous paragraph.
How do we determine if a horse is being ridden in relative elevation/correct collection, vs. absolute elevation/false collection? There are visual cues. It takes training the eye to see it in real time by studying photographs and video in slow motion and/or with repeated pausing of the video to check each moment in the stride. Once you can see it this way, you begin to develop the ability to see it in real time. It is not easy to learn to do, because even judges who have been trained and have years of experience will miss it, often rewarding the high poll and extravagant movement over the horse whose movement is perhaps less extravagant, but, much more balanced and harmonious. It is a task worthy of a lifetime of study, because if you are serious about dressage, even if only to achieve harmony and balance with your horse and not necessarily to compete at Grand Prix, then you will want to teach your horse to balance himself onto the hindquarters and learn not to “prop” with the front legs. The horse already naturally carries his balance more to the forehand at liberty, but when you add the weight of a rider to that horse, and we sit right behind the shoulder, you can see why it becomes very important to help the horse learn to better distribute his-and your-weight more evenly over all four legs.
Here is a super article that discusses the issue of Relative vs. Absolute collection in depth. Realize it is as much an opinion article as it is an educational article, nevertheless the illustrations offered are very informative. http://www.sustainabledressage.net/collection/false_collection.php
Below are two photos of the same horse, in the same photo session, taken probably less than a minute apart. This is passage. At first glance, the first photo appears much more spectacular. It is a fairly good moment and it does appear that the front end is very lifted. However if you then look at the next photo, you can see that the tension is now gone, as evidenced by the naturally hanging tail and the nose now clearly in front of the vertical. The horse suddenly appears shorter behind the saddle, and while both photos demonstrate the horse’s willingness to engage behind with powerfully coiled hind legs, the second photo clearly shows more correct loading of the stance hind leg. Do not be fooled by extravagant movement. Often the more expressive the movement, the more tension involved. With time and strength, the outline of the same horse in the second photo will serve to more correctly develop her topline and ultimately the expressiveness of a much more correct passage. Photo credit goes to Robert Schmidt of utahlens.com
 

If you think that this article does not apply to you because you are riding at Training level and only just schooling First level, think again. What you need to realize is that the best way to identify real collection is when the horse is “let out” into medium or extended trot. The possibility for this is already being developed at First level, where the Purpose of the level is defined as: “To confirm that the horse demonstrates correct basics, and in addition to the requirements of Training Level, has developed the thrust to achieve improved balance and throughness and maintains a more consistent contact with the bit.”

Thrust is what causes the horse to cover more ground, from the hind leg toward the front leg, as opposed to a horse that pulls itself along with reaching front legs and trailing hind legs. Upon moving to Second level, we read the following Purpose: “To confirm that the horse demonstrates correct basics, and having achieved the thrust required in First Level, now accepts more weight on the hindquarters (collection); moves with an uphill tendency, especially in the medium gaits; and is reliably on the bit. A greater degree of straightness, bending, suppleness, throughness, balance and self-carriage is required than at First Level.” Notice that the acceptance of weight on the hindquarters(collection) is EVIDENCED BY the uphill tendency in the medium gaits.

Below is a photo of a First level horse in a trot lengthening. The diagonal pair of legs are exactly parallel. His nose points exactly where his front foot is pointing. His throat latch his open. His shoulder even appears higher than his hip. While uphill balance is not a requirement at First level, since this IS First level test 3, it is nice to see that uphill tendency even in this lengthening. For top scores at this test, a judge will want to see that the horse looks as though he is prepared to move on to Second level. Photo credit goes to Terri Miller. 

On the other hand, here is a photo of a horse in working trot without that same degree of engagement. There are some things to like about this moment, however, this horse is not being asked to work in a way that will teach her to carry more weight on her hindquarters. It is okay at Training level, but she will need to learn to reach more underneath my seat with her hind leg in the swing phase, so that the hind leg in the stance phase is required to bend its joints more, thus allowing an overall better balance on the way to the development of collection. You can see by this illustration that how you ride your horse at Training level will set him up for correct collection in the future. If I were to ask this horse to lengthen stride with this much lack of engagement in the working trot, the strides would likely quicken rather than lengthen due to the balance already being on the forehand. It is thus in the extension that we find the proof of collection.

I hope this series of articles has been helpful. Recognize your place in the journey. Self examination is important for growth. We all make mistakes, but it is important to learn from them. Luckily for us, horses are very forgiving and so long as there is a steady supply of hay and carrots, they will usually suffer our ineptitudes with dignity and grace.
I dedicate this article to Charisma, the one noble soul who set me on this journey and allowed me to become a better person and rider while keeping me safe in spite of myself. To her I owe a debt I can never repay.


Thursday, February 22, 2018

Ride Your Horse Calm, Forward, and Make Him Straight


This article is the fifth in a series of articles that will serve to discuss in depth the various tiers of the USDF Training Pyramid. Every dressage rider should be very familiar with this Pyramid. The tiers are as follows: Rhythm, with Energy and Tempo; Relaxation, with Elasticity and Suppleness; Connection-Acceptance of the Bit through Acceptance of the Aids; Impulsion-Increased Energy and Thrust; Straightness with Improved Alignment and Balance; and Collection-Increased Engagement, Lightness of the Forehand, Self-Carriage. A pamphlet discussing it in depth may be found here: https://www.usdf.org/EduDocs/Training/Pyramid_of_Training.pdf
Since everything we do every day with our horses is interrelated, I will demonstrate with these articles specific connections between the various tiers, and how they can be used to facilitate the training of the horse at every level. The vast majority of riders and horses are at Training Level, but what the reader must understand is that this is the MOST IMPORTANT level, for horse and rider. A good education in the beginning secures the future of every dressage horse and every aspiring dressage rider. ~Stacy C. Williams
The USDF Training Pyramid defines Straightness(Improved Alignment and Balance) as follows: “A horse is said to be straight when the footfalls of the forehand and the hindquarters are appropriately aligned on straight and curved lines and when his longitudinal axis is in line with the straight or curved track on which he is ridden. By nature every horse is crooked, hollow on one side and stiff on his other side, thereby using one side of his body somewhat differently from the other. This also causes uneven contact in the reins. Appropriate gymnastic exercises develop the horse’s symmetry. This allows him to engage both hind legs evenly and prepares him for collection. This process improves the lateral as well as the longitudinal balance of the horse.”  Notice the term “longitudinal axis”-this means from poll to tail along the horse’s spine. Also notice the term “alignment”-it is exactly like the alignment in your vehicle. If the left front tire turns out and the left rear tire turns in, your tires are going to wear unevenly and your ride will be less than smooth. It is exactly the same for the horse’s alignment. All four legs must travel along the same axis, not deviating sideways. Now read the Purpose as stated at the top of all Second level tests: “To confirm that the horse demonstrates correct basics, and having achieved the thrust required in First Level, now accepts more weight on the hindquarters (collection); moves with an uphill tendency, especially in the medium gaits; and is reliably on the bit. A greater degree of straightness, bending, suppleness, throughness, balance and self-carriage is required than at First Level.”
It is important for the reader to realize that just because straightness is not mentioned in the Purpose of the tests at Training level and First level, does not mean that we should not already be looking for a degree of straightness right from the beginning. Read through the Directive Ideas for the movements in Training level test 1. Over the course of thirteen movements, “straightness” is mentioned seven times. Straightness is furthermore mentioned under the Submission section of the Collective marks at the end of each test. At its most basic level, straightness simply means that when travelling on a straight line, your horse must actually travel on a straight line. This is easier said than done! To further complicate matters, not only must your horse walk, trot, or canter on a straight line, but, his shoulders and hind legs must track straight. There should not be a bulge in the shoulder or a drift of the haunches. Now add to the equation the demand for turns onto and off of the centerline, twenty meter circles, transitions…all the while the horse has to stay exactly on the prescribed line of travel, and keep all his body parts on that track. This is very hard to do, mostly because horses are born crooked. But, here is where the rider comes into play as well. Humans are born crooked too. If the rider is unaware of her own crookedness, it is very likely she will be equally unaware of her horse’s crookedness. 
As a horse proceeds up the levels, his capacity for straightness must improve. But straightness begins at the beginning, from the first time he is lunged and the first time he is ridden. If the horse is unable to describe reasonably symmetrical circles around his lunger without a rider on his back, it is a sure bet that once mounted, the added weight and crookedness of the rider will only compound that lack of symmetry and alignment. As the horse progresses in his training, the rider has to assess from the first ride, and from the first minutes of every ride thereafter, whether the horse takes a symmetrical amount of contact on each side of the bit. This high degree of attentiveness to the early training rarely happens, and so we are frequently faced with having to address it once the horse has been under saddle for a period of time. This is the boat most of us are in. There aren’t that many Charlotte DuJardin’s out there, so even accomplished riders make mistakes or take shortcuts in the early training. Even at Training level, we have to start assessing whether or not we can ride our horses calmly forward with a level-appropriate degree of straightness.
I promised to link the layers of the Pyramid. While Straightness is near the top of the Pyramid, just before Collection, it can easily be assessed at the previous layers. If a horse is not travelling in a reasonable state of alignment right from the beginning, it will reveal itself in a variety of ways. The rhythm may be slightly marred, often noticeable at the canter when the stiff, crooked horse lands too soon with the leading front leg, causing the canter to appear lateral. The tempo will often vary, particularly from one track to the other. Some horses “run away” on their stiffer side, while others get “sticky” on their stiff side. The connection will be too strong on one rein and not secure enough on the other rein. Impulsion will suffer if one hind leg is habitually stepping to the outside of the center of mass, as will uphill balance-a hallmark of Collection. These issues can easily be categorized under the Relaxation with Elasticity and Suppleness portion of the Pyramid due to the fact that they are addressed by means of various suppling exercises, but think of Suppleness and Straightness as being two sides of the same coin. No part of the Pyramid can really be separated from the others or worked in exclusion of the others. It is just a matter of degrees. I personally feel that ALL layers of the Pyramid should be present in every horse at every level and that the only thing that changes is the degree of expectations for the quality that will be exhibited. This mindset plays homage to the often-heard debate of whether Straightness should in fact be placed ahead of Relaxation/Suppleness on the Pyramid. It isn’t, in my mind, a matter of one before the other, but rather, a matter of both developing together. Anyone with experience in Natural Horsemanship will tell you that if the horse’s body is comfortably aligned and able to move in a balanced way, that will go a long way toward improving his mental relaxation. I cannot tell you how many horses I have taken in as reschool projects who were so completely crooked within their bodies and in their way of going that they had become very nervous and difficult under saddle. Simply addressing the extreme lack of symmetry, balance and alignment did wonders for the Relaxation of these horses. Horses do not like to feel out of balance as it impedes their ability to protect themselves.
With all the above in mind, how do we set about developing straightness in our horses? I will remind the reader of the definition of Straightness, and reference the second half of it directly here: Appropriate gymnastic exercises develop the horse’s symmetry. This allows him to engage both hind legs evenly and prepares him for collection. This process improves the lateral as well as the longitudinal balance of the horse.”  Key to this is the word “appropriate”, meaning, appropriate to the horse’s level of training and the rider’s level of experience.  It all starts with the lowly twenty meter circle. Can you ride a perfectly round circle? The old masters would hand rake the ménage before riding in order to determine if their circles were accurate. I recommend doing this sometime. Riding a correctly shaped circle, versus an oval, an egg, or even a potato chip as one former student described her attempts at a circle, is not easy. There will be many potato chips on the road to the perfect circle. I teach students how to do it by first teaching them the geometry of the arena, and then, setting up guide cones. Cones are a rider’s best friend. I use them when training young horses too, not just for the new riders. They are not expensive, and are incredibly useful all the way up the levels. I have used them for developing turns on the haunches, turns on the forehand, and even the pirouette canter. Besides the twenty meter circle, the other critical figures for developing a horse’s straightness at Training level are changing rein across the diagonal, riding the centerline, and staying the same distance from the rail the entire length of the rail. If a horse is not reasonably straight, staying the same distance from the rail for a full sixty meters is nearly impossible. As riders become more skilled and horses more educated to the aids, the leg yield becomes a very valuable tool. While a leg yield technically falls under the heading of a suppling exercise, I would like to point out a critical piece of the straightness equation here. How many leg yields have you witnessed that drift sideways with the horse’s shoulders dragging the rest of the train lazily behind? When riders get back their score sheets and they read “haunches trail” with the commensurate low score, they generally then proceed to use more leg in a vain attempt to get the hind legs to cross, and then wonder why their horses just run faster instead of crossing more. Been there, done that. But think about the leg yield this way. Your horse’s body might be two or three feet wide in total. If you start your  leg yield with the shoulders already bulging a foot in distance to the outside, now suddenly the diagonal hind leg has to go a third to twice the distance as the front leg in order for your horse’s body to remain parallel to the long side. If the rider instead pays attention to where the shoulders are before starting the leg yield, the hind leg will not have to travel nearly as far in order to connect to the outside rein, which is the whole purpose of a leg yield: to develop inside leg to outside rein connection. This one small attention to the detail of Straightness appropriate to the level on the part of the rider will make the horse’s job infinitely easier and leg yields will require little to no leg. A simple shift in the rider’s weight will make it happen. To continue with the concept of level-appropriate gymnastic exercises, shoulder in becomes the mother of gymnastic exercises. It’s younger cousin, shoulder fore, should be a state of daily ridden existence for horses as soon as they are able to understand the concept of inside leg to outside rein. Ultimately the haunches have to be controlled as well, and this is where the more difficult gymnastic exercises of travers, renvers, turns on the haunches and half pass come into play. The more correctly the rider can bend her horse and connect her horse, the easier it becomes to straighten her horse in the truest sense of the concept. Once the shoulders can be correctly placed in front of the inside hind leg, a horse is well on its way to being sufficiently strengthened, engaged, and balanced for more advanced collected work.
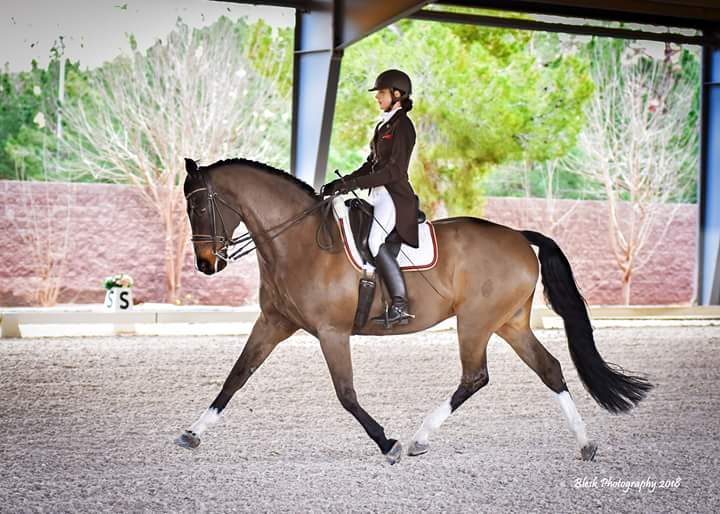
Straight Rider, Straight Horse, Photo Credit Blesk Photography

What Does Impulsion Look Like?


This article is the fourth in a series of articles that will serve to discuss in depth the various tiers of the USDF Training Pyramid. Every dressage rider should be very familiar with this Pyramid. The tiers are as follows: Rhythm, with Energy and Tempo; Relaxation, with Elasticity and Suppleness; Connection-Acceptance of the Bit through Acceptance of the Aids; Impulsion-Increased Energy and Thrust; Straightness with Improved Alignment and Balance; and Collection-Increased Engagement, Lightness of the Forehand, Self-Carriage. A pamphlet discussing it in depth may be found here: https://www.usdf.org/EduDocs/Training/Pyramid_of_Training.pdf
Since everything we do every day with our horses is interrelated, I will demonstrate with these articles specific connections between the various tiers, and how they can be used to facilitate the training of the horse at every level. The vast majority of riders and horses are at Training Level, but what the reader must understand is that this is the MOST IMPORTANT level, for horse and rider. A good education in the beginning secures the future of every dressage horse and every aspiring dressage rider. ~Stacy C. Williams
The USDF Training Pyramid defines Impulsion(Increased Energy and Thrust) as follows: “Impulsion is the term used to describe the transmission of an eager and energetic, yet controlled, propulsive thrust generated from the hindquarters into the athletic movement of the horse. Impulsion is associated with a phase of suspension such as exists in trot and canter, but not in walk. It is measured by the horse’s desire to carry himself forward, the elasticity of his steps, suppleness of his back, and engagement of his hindquarters. Impulsion is necessary to develop medium paces, and later on, with the added ingredient of collection, extended paces.”
If you think you should stop reading now because that description included a discussion of the medium, collected and extended paces, and you are “only” working at Training level, then you will be missing out on the big picture and ultimately slowing your progress. Here’s why: Like Rhythm, Impulsion is included as one of the Collective Marks in the General Impressions section of all Dressage tests. Rhythm is addressed directly in the Gaits score with the term “Regularity”, and Impulsion itself is a coefficient. All the other tiers of the Training Pyramid are addressed in a more holistic manner throughout the tests in the Directive Ideas. With the above description of Impulsion in mind, here is what the USEF Tests say with regard to Impulsion in the Collective Marks: “IMPULSION (Desire to move forward, elasticity of the steps, suppleness of the back, engagement of the hindquarters)”
Even at Training level, we must think of the future. Besides, if you are showing Training level, you should ideally be schooling First level at home, and even dipping your toes into the shallow end of Second level with such helpful lateral work as shoulder in. With that in mind, now read the Purpose as stated at the top of the First Level tests: “To confirm that the horse demonstrates correct basics, and in addition to the requirements of Training Level, has developed the thrust to achieve improved balance and throughness and maintains a more consistent contact with the bit.” The word “thrust” is the key here. First level is the first time the horse is expected to demonstrate the thrust necessary to produce lengthenings of stride, a consistently level balance, and, more consistent contact. Since thrust is a key component of Impulsion, it is therefore a desirable quality at every level. However, in my experience, terms such as Impulsion and Engagement are widely misunderstood by most riders until they have achieved a number of years of experience developing horses up the levels. I will attempt to clarify it in a written format, with the caveat that I feel the only way to really understand is to first be able to identify it visually in the ridden horse, and, then, to feel it under saddle.
Let us first say what Impulsion is NOT. Impulsion is not speed. Impulsion is not explosiveness. Impulsion is not slow, either. It is a well-known Dressage cliché: Speed is the enemy of impulsion. Impulsion is that happy place of a horse that is very easy to ride forward or sideways with minimal driving aids. The horse remains focused on his rider, staying active with the hind legs which work towards the center of the horse’s mass, so as to maintain enough balance to demonstrate the requirements of the level at which horse and rider are working. In other words, the horse is using his propulsive power in such a way as to produce a harmonious performance. It is often said that the more impulsion one has, the more submission one needs. I love this statement, and, do agree with it. However, we as riders have to respect who our horses are. Every horse comes with his own degree of innate power. On a certain level, too much submission will inhibit the impulsion, and riders who are over-horsed will have no choice but to become guilty of inhibiting that impulsion just because they want to feel safe. There is NO shame in this whatsoever, but it is a reality that must be respected by all involved in the team and we as riders have to be fair in our expectations of our horses. We can’t kick and hold, it just isn’t fair. The kind horse will shut down and tune out, and the challenging horse will become naughty and unpredictable. We can only ask for what we can tolerate.
When I think of impulsion, I think of it in all caps: IMPULSION. The degree of impulsion needed as one proceeds up the levels increases dramatically, and it is very hard to add it back once it has been taken away. It is therefore very important, if the rider and/or the horse have plans to work at higher levels later on, that the horse be ridden by someone early in its career who will not be afraid to feel “THE POWER”. A Grand Prix horse really needs to have a great deal of desire to go forward that is not generated by the rider. This kind of self-going power can be intimidating to ride, so it is understandable that a greener, less “broke” horse might be ridden well under power in the interest of safety. That said, the DESIRE to go forward should never be blocked by the rider, if the advanced levels are a goal for the horse. There will eventually come a time when the rider must trust(allow), and, the horse must….GO.
When watching horses work, one can look for physical signs of a high degree of impulsion by looking for the following characteristics. First, a horse with good to excellent impulsion will appear to work mostly on his own, with the rider playing the role of guide. Second, the horse’s hind legs will take the same length of stride forward underneath the center of mass, which will allow the horse to reach evenly into both reins with no twist in the neck or tilt in the poll. Third, in the stance phase, the hind leg will work more from the point of the hip forward, rather than coming too far behind the vertical before pushing off. It will also flex well in the hock and stifle during this stance phase, vs. stiffening(this is what we mean by “engagement”). It is this engagement that gives the horse the ability to work in a better balance, less and less on the forehand as the training progresses. Fourth, there will be a more marked moment of suspension, producing what we call “cadence”. Lastly, the back will appear to lift the entire front end(“relative elevation”), and the muscles will appear filled and swinging.
When riding your horse, you can look for the feeling created by improved impulsion. If your horse feels as though he is taking you around the arena and is more or less maintaining the tempo and pace without much direction from you, you are well on your way. This is not as easy a feeling to produce as one may think. Horses will fail to maintain the tempo and pace for a number of reasons: lack of balance on the part of the rider who will therefore block the horse with her hands and/or gripping legs; lack of symmetry in the ability to bend left vs. right(if your horse speeds up on one track and slows down on the other, that is a sure sign he is not yet symmetrical in his bending); lack of evenness in the rein contact(this is a chicken and egg situation-is the uneven contact due to a mouth/hand/rein issue, or, is it due to an uneven hind leg? The rider, with help from a more experienced trainer, must determine this early and often.); laziness on the part of the horse; and last but not least, timidity on the part of the rider.
This is a theory article and not a training article but I will diverge for a moment to address a common issue. Rider fear is one of the biggest inhibitions horses face when developing the impulsion necessary to advance through the levels. It can be very intimidating to ride a big warmblood at his full power. It is important to assess realistically your tolerance for impulsion as a rider, and then learn to be consistent and fair in your expectations of your horse, based on your tolerance. You can most definitely improve your tolerance for that impulsion with careful “guts-building” work. This is done in a safe and familiar atmosphere, by establishing your baseline impulsion for the ride. Then, if only for a few strides at a time, push your hands a little bit forward, sit a little more up, tick your horse a couple times with the lower leg and just “let” him go on his own. It is a little bit like learning to ride a bicycle without holding onto the handle bars. Just try for a few strides at a time. You will find that this will not only improve your tolerance for impulsion, but it will also improve your horse’s forward desire, your balance as a rider, and the overall connection. There are other ways to improve your tolerance for the power needed to improve your horse’s impulsion. Make sure you are as safe as possible, and, work with your trainer to come up with a plan to develop your boldness as a rider in a systematic way. I like to ride out on the trail and school there, but, not everyone has access to trails or a trail-safe horse. Other ways to achieve similar results might be to do more canter work early on in the ride so as to free up your horse’s back; to do more canter work in general; to use cavaletti work(Jan Lawrence wrote a fantastic series of articles for the Newsletter last year); and to view bad weather days or barn distractions as opportunities to learn to ride your horse in more exciting situations that naturally help to improve their energy level. Again, safety is paramount, so it is important for you to work with your team to create a systematic plan to develop your confidence that works for you and your horse. Honor your place in the journey.
Even though impulsion is scored individually in the Collective Marks at the end of your test, it is nevertheless an integral part of the Directive Ideas for each individual movement within the tests. A high degree of impulsion will just make everything that much better. It is that little something extra which gives all the movements sparkle. A technically correct, three track shoulder in with insufficient impulsion will result in a 6 or 6.5 at best. But if the horse “powers down” with the hind leg causing him to lift the back and shoulders, takes springy steps that reach well forward, and reaches boldly toward the bridle with the neck, that same technically correct shoulder in now becomes an 8.5 or more. Even though elasticity is often thought of as more of an innate trait in a horse, it can absolutely be developed and improved. It is developed when the horse learns to carry himself boldly forward day in and day out, every stride, every ride. Even if your horse was born a small mover, you can absolutely develop the impulsion and elasticity with good riding and training. One of the best ways I know to improve a horse’s impulsion in a positive way is to take your training to the trail. I frequently school higher collection while on the trail, because then my horses want to go, and I can just sit in and half halt to produce more elasticity in the steps while the horse keeps the pedal to the metal-so to speak-all on his own. Below is a photo by Robert Schmidt of utahlens.com, demonstrating this. This horse came to me with a very well developed piaffe, but the passage lacked cadence, lift and scope. By working it on the trail, I was able to take her added freedom into the work, developing the passage into something to really write home about and make it match her beautiful piaffe. It is the classic example of that cliché that we need to feel collection in the extension, and, extension in the collection. She wanted to extend here(you can see it in the coiled haunches!), and all I had to do then was sit in more and hold her on my seat.


Sunday, December 17, 2017

How are Connection, Rein Length, and Weight in the Reins Related?

This article is the third in a series of articles that will serve to discuss in depth the various tiers of the USDF Training Pyramid. Every dressage rider should be very familiar with this Pyramid. The tiers are as follows: Rhythm, with Energy and Tempo; Relaxation, with Elasticity and Suppleness; Connection-Acceptance of the Bit through Acceptance of the Aids; Impulsion-Increased Energy and Thrust; Straightness with Improved Alignment and Balance; and Collection-Increased Engagement, Lightness of the Forehand, Self-Carriage. A pamphlet discussing it in depth may be found here: https://www.usdf.org/EduDocs/Training/Pyramid_of_Training.pdf
Since everything we do every day with our horses is interrelated, I will demonstrate with these articles specific connections between the various tiers, and how they can be used to facilitate the training of the horse at every level. The vast majority of riders and horses are at Training Level, but what the reader must understand is that this is the MOST IMPORTANT level, for horse and rider. A good education in the beginning secures the future of every dressage horse and every aspiring dressage rider. ~Stacy C. Williams
Connection(Acceptance of the bit through acceptance of the aids) is the third tier in the USDF Training Pyramid. The explanation further illuminates: “The energy generated in the hindquarters by the driving aids must flow through the whole body of the horse and is received in the rider’s hands. The contact to the bit must be elastic and adjustable, creating fluent interaction between horse and rider with appropriate changes in the horse’s outline. Acceptance of the bit is identified by the horse quietly chewing the bit. This activates the salivary glands so that the mouth becomes moist and production of saliva is evident. The softly moving tongue should remain under the bit. The quality of the connection and balance can be evaluated by ‘üeberstreichen’, releasing the reins (to demonstrate self carriage) or by allowing the horse to chew the reins out of the hands (to demonstrate relaxation).”

This article will be on the longer side, simply because the concept of connection is by nature very specific to each individual horse and rider, and is furthermore a dynamic state, changing within the ride, from day to day and from year to year.  This makes it a very nebulous concept that is difficult to explain. It has to be felt. This is why robots will never be able to judge dressage, and is also why dressage judges trained within the same system will have differences in opinion. It is the point from which all of the advanced work develops, thus a clear understanding on the part of the horse and the rider is critical.
Perhaps one of the most concerning topics for newer dressage riders is rein length, and, the amount of pressure or weight in the contact. It is a subject often discussed. The most difficult concept for riders to learn at the basic levels is how contact(the amount and the evenness of the pressure in the rein) relates to connection(the ability to influence the back and hind end and stay "on the aids" aka "throughness"). Many riders want me to tell them which notch on their handstop reins is the correct notch. Unfortunately, my answer always has to be "it depends". If there was a set formula for these kinds of things, dressage would not be so difficult. It would boil down strictly to science, vs. the art that it actually is. Art is a reflection of emotion, feel, or intuition. However, good art is always based in science and therefore the two are not wholly independent. An artist who does not have the technical skill to use her tools correctly cannot convey her vision, no matter how creative.

So how long should a dressage rider's reins be? Furthermore, how much pressure should the rider feel in her hands? It depends. The first thing riders must understand is that the contact belongs to the horse, and connection is a gift the rider earns. It is the job of the rider to ensure that the horse is first traveling with a good forward thought, with correct rhythm in all three paces. The horse should be supple enough to bend somewhat symmetrically left and right, all with a relaxed state of mind and minimal negative emotional or physical tension. Once this is established, the length of the rein and the weight of the contact depend on a number of factors: 1. The ability of the horse to engage the hind leg, whether affected by level of training or conformation. A long backed, downhill horse will obviously be less able to engage the hind leg and shift its balance to load the hind end during the stance phase as compared to a horse that is shorter and more uphill. 2. The degree of lateral and longitudinal suppleness of the horse. 3. The lateral and longitudinal flexibility of the horse’s jaw and poll and the amount of space in the throatlatch area. 4. The sensitivity and/or stoicism of the horse. Iberian horses often prefer a lighter feel, whereas a more old-fashioned style Warmblood may prefer a much more solid feel. 5. The horse’s conformation in terms of neck shape, set and length. 6. The correctness of the rider’s seat and hands as well as the rider’s physical strength. This correctness goes directly to “tolerability” of the contact that the rider offers the horse. It goes without saying that the more correct the rider’s seat and hands are, the more tolerable the contact will be for the horse. 7. The stage of training of the horse. A green horse, be it a green Training level horse or a green Grand Prix level horse, may at times need more help balancing. The more confirmed the horse is at its level, the better able it is to hold the connection through the rider’s seat vs. relying on the support the bit creates. There are many more factors that could be mentioned here, but these are the most common.

Biomechanical studies have shown that most horses prefer a weight of roughly 2 lbs in each rein. This more or less answers the question of how much weight should be in the reins. But the nuance of the feel in that weight can vary greatly. Two pounds of dead weight with no adjustability will cause even the strongest rider’s fingers to fall asleep and shoulders to get sore. One can only imagine how the horse must feel in this scenario as well. On the other hand, a highly trained horse who is strengthened to full capacity and in complete balance and harmony may work with only the weight of the reins and still remain completely connected to his rider. Furthermore, a very powerful and big moving horse can offer a very elastic and malleable connection of five or more pounds, particularly in the extended paces or in the passage. Ultimately, it is the responsibility of the rider to develop her seat and position to such a degree that the “feel” is not lost in the contact. A rider who falls behind the motion or stands in the stirrups will necessarily rely on the horse’s mouth for her balance, thus limiting the horse’s ability to use the contact to create an honest connection from the hind leg, through his back and into the rider’s hand.

As for rein length, again it depends. The horse who is properly connected from the hind leg, through its back and into the rider’s hand will fill up the length of the rein as it is lengthened gradually by the rider, stretching down and out. This is why the stretch down circle is such a fundamental part of the tests in Training and First level. There also used to be a canter stretch down at Second level, and conscientious riders will still check the horse’s willingness to stretch every single ride, at every pace. The difference between a beginning rider and a more educated rider is that a beginner will view that pesky trot stretch down circle in the Training and First level tests as a “movement” and not as a tool to gauge the honesty in the connection as the educated rider does. The horse lowers and stretches as the rider tactfully feeds out length, yet remains completely adjustable. Any horse can be taught to drop its head to the floor on cue, often seen when riders widen their hands or see saw the bit. That is not connection and will not develop the scope in the topline needed for advanced work.

Riders must realize that a long rein is not any more kind than a short rein, and quite often it can actually be less kind. If the reins are too long, and the horse is not properly connected, completely on the aids, and in full self-carriage, then by necessity the rider will only be able to make contact by pulling back. Using the hand in a backward fashion is a cardinal sin in development of a horse’s willingness to accept the bit. Recall my earlier statement that the contact belongs to the horse. The other major realization for riders concerning rein length is that in order for the contact to remain elastic, the length of the rein must be elastic, not static. This elasticity comes from the stability of the rider’s seat and position, and the ability to absorb the bounce in the elbows. The wrists must remain stable, but, the elbows must flow and follow, to eliminate any “snapping” of the reins. The rider must be able to adjust the rein length quickly and tactfully at any point throughout the ride, without disturbing the acceptance of the bit. Anyone with some climbing experience might relate to the following comparison. A rock climber always climbs on a rope that is dynamic. The rope has some stretch. The lead climber always has a very light but elastic connection to this rope, and it is the life-saving job of the belayer to maintain just enough connection with his leader to prevent a fall to the deck. If the lead climber were to fall, the elasticity in the rope would give slightly and thus absorb energy from the fall, preventing the climber or his belayer from being snapped in half upon making full contact with the rope. This system only works if there is not too much slack in the rope, nor too much tension which would prevent the leader from advancing upward. This is a life and death scenario, but nevertheless clearly emphasize the need for a proper understanding of connection. As it pertains to the feeling the horse encounters, if a rider does not have enough control over her position to maintain a light, elastic, reasonably steady connection with the horse’s mouth, the horse will feel that same “snapping” at every rise and fall of the stride. Place a bit over your shin and have a non-riding friend move the reins in various ways if you would like to understand how the unpredictability of an inelastic and unsteady elbow/hand/bit connection can cause you great distress. Such is the lot of the horse and it is important for every rider to work very hard to improve her position enough to offer a “tolerable” contact to her horse.

How does a rider determine whether or not the connection is good? Much of this depends on feel. The horse will feel easier to sit, even(especially) a big moving horse, because the connection from the hind leg to the hand creates a steady wave on which the rider can balance and follow. The sounds of the footfalls will diminish as the horse’s body and back absorb the concussion. The space behind the saddle will fill in as all of the muscles of the horse’s back fill and stretch in reaction to the lifted abdominal muscles. The horse may feel taller as the hind leg engages and bears more of the load. The legs will work in sync and there will be no roughness in the way each hoof impacts the ground. The rider will be able to open and close the horse’s frame-commensurate to his level of training-at will. The horse will go easily forward, and respond smoothly to the half halt. A rider who understands fully the concept of a quality connection also understands that you don’t teach a horse extended trot as though it is a movement. Extended trot develops naturally over time, with correct attention to the basic details of rhythm and all it encompasses; relaxation and all it encompasses; and the development of an even and committed acceptance of the bit by a horse that is genuinely on the aids and in front of the leg.

Connection is where the rubber meets the road in this discipline, and the quality of it can make or break a horse’s ability to progress through and beyond Second level, which is the foundation for all the advanced work. It also will make or break a rider’s ability to ride at an advanced level, because a horse that is well connected is easier to ride. Ask any Grand Prix rider, and they will tell you they spend the bulk of their rides developing the basics of Rhythm, Relaxation and Connection. They use the touchstone of Second level work to prepare their horse day in and day out. It behooves every rider and every horse to work every day toward an elastic, dynamic, mutual connection irrespective of competitive goals. Who doesn’t appreciate that feeling of oneness only achieved when horse and rider are genuinely connected?

The photos that follow will illustrate some points outlined in the article. I like to use photos of myself and my own horse for a more real world comparison, and also for copyright reasons.

Photo one illustrates a three year old horse showing at Training Level at his first show, in proper connection. Notice the parallelism of the diagonal pairs of legs, the slightly open throatlatch, and the reach through the entire topline towards the bit. The rider’s elbows are allowing forward, and the line from the elbow, through the forearm, the hand and to the bit is straight. The poll could be slightly higher, but this is a good moment in connection for a young horse. Photo credit Dow Williams
Photo two illustrates a Third level horse who has lost the commitment to the connection. At first glance, it’s quite a nice-looking moment, but on further examination you will see that he is not reaching out to the hand and has instead retracted his neck slightly. The rider’s hands are slightly above the line of connection. If the photo were taken from the other side, we would notice that the joints of the hind leg have not taken enough weight to sufficiently lift his entire mass into a more uphill, “out to the bridle” manner. This is a great example of an honestly working horse who is not quite yet strong enough to support his mass in more advanced work. It isn’t a terrible moment, but, little leaks sink big ships. Photo credit Andalusian World Cup


On Lightness and Harmony

If the rider's aids are precise and well-timed(QUICK), there is no need for strength. That is the lightness we're seeking: a precise...